In the earlier post, you saw how to take the approach to convert your normal business into a SOA supported business.
In this example, we need to create five carbon application projects to support various aspects of this shopping cart.
1. AcmeBackendServices - to create all the back-end related artifacts
2. AcmeFrontendMonitor - to create all front-end gadgets
3. AcmeFrontendOperator - to create Web application artifact to manage Acme shopping cart
4. AcmeFrontendUser - to create front-end portal
5. AcmeShoppingService - to create inter-mediate message passing ESB artifacts
Set up your environment to create the shopping cart's data service in carbon studio
resources related to several artifact types such as ESB, BPS, Data Services, Gadgets etc.
mvn clean install -Dmaven.test.skip=true
For this, you should have apache-maven installed in your machine. (Don't have maven? Download and install as per README)
Creating Data Service
From here onwards I will refer the location of your shopping cart sample as, SHOPPING-CART_HOME
Copy that to your DS_HOME/samples. (Merge the two database folders.)
Now you have the database setup regarding shopping cart (with tables such as Category, Product, Customer, Payment etc.) in your system.
With Carbon studio, you can create data service artifacts pointing to a data service descriptor file (.dbs) in several ways. In this sample, we will just import the data service descriptor file that we have checked out. (SHOPPING-CART_HOME/data-service/dbs/ShoppingCartDS.dbs)
For that, go to File --> New --> Project...
 Select Carbon Application Project from the wizard.

Give the name for the project as AcmeBackendServices and a location to save and click Finish.

Now you will see a new project is created with the given name, according to the following structure.

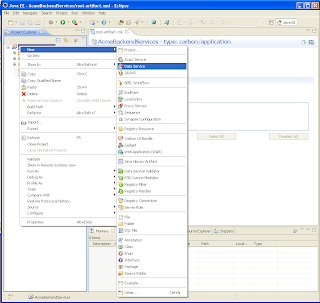
Now you will get a wizard. Since we already have the data service descriptor (.dbs) file in the checked out SHOPPING-CART_HOME/data-services/dbs directory, we will select the option Import data service from file. Give the location to the .dbs file.
 Select AcmeBackendServices CApp project and click Finish.

Congratulations!!
You have set up the data service required for the Acme Shopping cart.
Go to root-artifact.xml.
There it will show the Existing artifacts in that CApp. At this moment, you will see only ShoppingCartDS as an available artifact. Select it and save.

Now we can create the carbon application archive (.car) project out of this AcmeBackendServices by clicking on top right corner icon in the root-artifact.xml graphical view.

Specify a location to save the .car
Go to Manage -> Applications -> Add
Upload the created AcmeBackendServices.car

Go to Manage -> Services -> List
If the .car got deployed without any errors, you will see the ShoppingCartDS listed there.
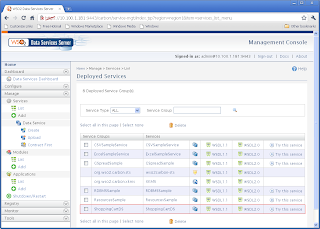
You can click on Try this service and see whether it is working properly.

You have successfully exposed your legacy database to the shopping cart application now through a web service.
Await for the next post. It will demonstrate how to create a gadget to view these database information.
In this example, we need to create five carbon application projects to support various aspects of this shopping cart.
1. AcmeBackendServices - to create all the back-end related artifacts
2. AcmeFrontendMonitor - to create all front-end gadgets
3. AcmeFrontendOperator - to create Web application artifact to manage Acme shopping cart
4. AcmeFrontendUser - to create front-end portal
5. AcmeShoppingService - to create inter-mediate message passing ESB artifacts
Set up your environment to create the shopping cart's data service in carbon studio
- Step 1
- Step 2
resources related to several artifact types such as ESB, BPS, Data Services, Gadgets etc.
- Step 3
mvn clean install -Dmaven.test.skip=true
For this, you should have apache-maven installed in your machine. (Don't have maven? Download and install as per README)
- Step 4
Creating Data Service
From here onwards I will refer the location of your shopping cart sample as, SHOPPING-CART_HOME
- Step 1
Copy that to your DS_HOME/samples. (Merge the two database folders.)
Now you have the database setup regarding shopping cart (with tables such as Category, Product, Customer, Payment etc.) in your system.
- Step 2
With Carbon studio, you can create data service artifacts pointing to a data service descriptor file (.dbs) in several ways. In this sample, we will just import the data service descriptor file that we have checked out. (SHOPPING-CART_HOME/data-service/dbs/ShoppingCartDS.dbs)
- Step 3
For that, go to File --> New --> Project...


Give the name for the project as AcmeBackendServices and a location to save and click Finish.

Now you will see a new project is created with the given name, according to the following structure.

- Step 4

Now you will get a wizard. Since we already have the data service descriptor (.dbs) file in the checked out SHOPPING-CART_HOME/data-services/dbs directory, we will select the option Import data service from file. Give the location to the .dbs file.


- Step 5
Congratulations!!
You have set up the data service required for the Acme Shopping cart.
- Step 6
Go to root-artifact.xml.
There it will show the Existing artifacts in that CApp. At this moment, you will see only ShoppingCartDS as an available artifact. Select it and save.

Now we can create the carbon application archive (.car) project out of this AcmeBackendServices by clicking on top right corner icon in the root-artifact.xml graphical view.

Specify a location to save the .car
- Step 7
Go to Manage -> Applications -> Add
Upload the created AcmeBackendServices.car

Go to Manage -> Services -> List
If the .car got deployed without any errors, you will see the ShoppingCartDS listed there.

You can click on Try this service and see whether it is working properly.

Await for the next post. It will demonstrate how to create a gadget to view these database information.
Hi Manisha,
ReplyDeleteas I try to build the sample project, I get the following stack trace;
https://docs.google.com/document/d/1DtVIYONbpyy_BiOh4hzogdhlC7aYJbpNcDSYJcQPLNA/edit
I'm using Maven 3.0.4, I have downloaded all dependencies, I'm on JDK 1.7.0._07...
Thanks in advance...