Wednesday, March 30, 2011

org.apache.axis2.AxisFault: The signature or decryption was invalid; nested exception is: org.apache.xml.security.encryption.XMLEncryptionException: Illegal key size

In each and every WSO2 product, "Security" plays a major role. Any web service hosted in a WSO2 server can be secured with a pre-defined security policy.

It is not enough if only the service is secured. The client who invokes that service too should be adhered to that particular security policy which is applied on the service.

I too once wanted to invoke the secured Hello Service hosted in WSO2 BPS via a secured client.
There is a good blog that I came across where I could get my requirement fulfilled.
http://pathberiya.blogspot.com/2009/10/simple-way-to-secure-your-bpel-services.html

When I tried to run the client after starting up the server I came across the following error.
org.apache.axis2.AxisFault: The signature or decryption was invalid; nested exception is: 
org.apache.xml.security.
encryption.XMLEncryptionException: Illegal key size
Original Exception was java.security.
InvalidKeyException: Illegal key size
at org.apache.axis2.util.Utils.getInboundFaultFromMessageContext(Utils.java:527)
at org.apache.axis2.description.OutInAxisOperationClient.handleResponse(OutInAxisOperation.java:375)
at org.apache.axis2.description.OutInAxisOperationClient.send(OutInAxisOperation.java:421)
at org.apache.axis2.description.OutInAxisOperationClient.executeImpl(OutInAxisOperation.java:229)
at org.apache.axis2.client.OperationClient.execute(OperationClient.java:165)
at org.apache.axis2.client.ServiceClient.sendReceive(ServiceClient.java:555)
at org.apache.axis2.client.ServiceClient.sendReceive(ServiceClient.java:531)
at SecurityClient.runSecurityClient(SecurityClient.java:86)
at SecurityClient.main(SecurityClient.java:30)
Exception in thread "main" java.lang.NullPointerException
at SecurityClient.main(SecurityClient.java:34)

Also I found a simple solution to resolve this. 
  1. Download  Java Cryptography Extension (JCE) Unlimited Strength Jurisdiction Policy Files that is compatible with your Java version. 
  2. In the JAVA_HOME/jre/lib/security directory (JAVA_HOME - the directory that you have installed JAVA), you will see local_policy.jar and US_export_policy.jar 
  3. Replace the two jars with the new JCE jars that you downloaded.
  4. Restart the server and run the client again
This will resolve your error.

Enjoy a secured life!!  :)

Saturday, March 26, 2011

The BASEDIR environment variable is not defined correctly. This environment variable is needed to run this program

Last Wednesday, I received a new Tecra (Toshiba) with Core i5 as a replacement for my ASUS machine from the company that I work with. Started installing all the softwares to the new machine that I had in my old machine. 
When tried to run tomcat with sh catalina.sh, it gave the following weired error. 
The BASEDIR environment variable is not defined correctly. This environment variable is needed to run this program
For a moment I wondered what needs to be done, and then I came across a few posts and forums that has given the solution to my problem. 
That small tip perfectly worked, so just thought of sharing it with you. You may need this some day. 
In a terminal type the following command which changes the permission of all the .sh directories in the system.
chmod 777 *.sh
This allowed me to run the tomcat server just perfectly. 
Enjoy!! 

Sunday, March 6, 2011

Build Endpoints to a Data Service using WSO2 Carbon Studio

With the hosted ShoppingCartDS, we need to use this DS for various transactions. Within these transactions, there need to be certain end points for various operations such as Admin Services, Purchasing Services etc.

WSO2 Carbon Studio to create Gadgets for data display

After following the previous post, you could deploy a data service created using a legacy database system. Now we will see how to create a gadget that can be utilized for front end monitoring of the system.
  • Step 1
To add gadget related artifacts, we will create a separate carbon application project named AcmeFrontendMonitor as we done so to deploy the data service.
To create a gadget artifact, right click on the AcmeFrontendMonitor project and select Gadget from the menu.
   

  • Step 2
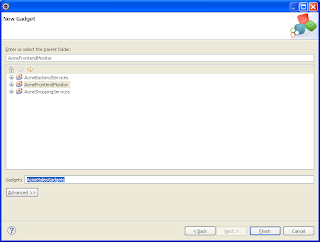
In the wizard, give the name AcmeSalesGadgets to the new gadget. Since we have all the gadget related resources in our checked out location, we will select Import gadget resource folder from file system and browse for the location SHOPPING-CART_HOME/gadgets/src/gadgets/acme-sales-gadgets/ and click Next.

   
Select the AcmeFrontendMonitor CApp project and click Finish
   

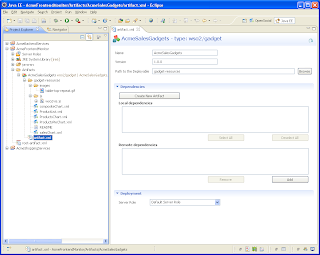
Now you will see new Gadget artifact called AcmeSalesGadgets is created under AcmeFrontendMonitor CApp project.
   
  • Step 3
Download the WSO2 Gadget Server to deploy the created gadgets.
The installed location will be refered as GS_HOME

Since we need to monitor the database status via gadgets, it is obvious that data service too should be available at the monitoring time. To achieve this real time behaviour we need to make the GS available in another port different to the port that DSS runs on.
For that, go to GS_HOME/repository/conf and open mgt-transports.xml and change http and https ports to 9768 and 9448 respectively. Save the changes and start the gadget server.
  • Step 4
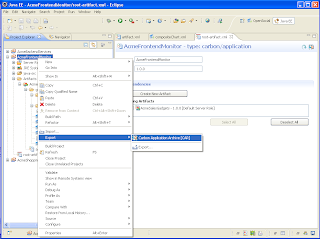
Go to root-artifact.xml of AcmeFrontendMonitor and tick AcmeSalesGadgets artifact and save the changes.
To export AcmeFrontendMonitor, right click and select Carbon Application Archive [CAR] from the Export menu.
   
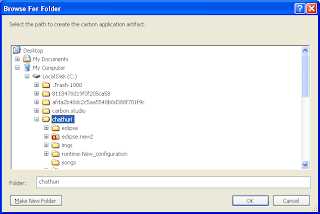
Specify the location to save the .car file.
   
   
  • Step 5
Yey!!!!
Now you are done with creating the .car file which is ready to deploy in GS.
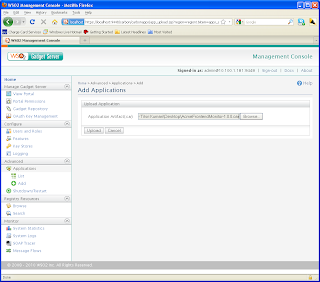
Start up the GS. Go to Management console. Navigate to Advanced --> Applications --> Add.
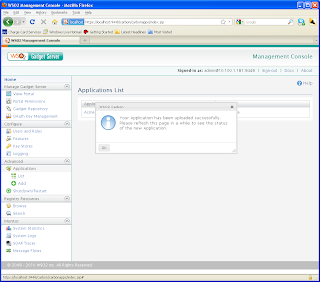
There you give the path to the .car file that you created just now. Hit Upload.
   
If upload is success, you will get a pop up as follows
   
  • Step 6
Now you have deployed the gadget at GS. Finally you have to make the gadget viewable by following the simple steps below.

 * Go to Registry Resources --> Browse. * From the tree, go to /_system/config/repository/dashboards/gadgets
 * There you will see all the gadget xml files that we added from shopping cart sample.
    
 * In that directory tree, click on gadgets and in the wizard that opens, set the permissions to wso2.anonymous.role as shown below.
    
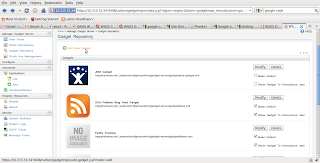
 * Go to Manage Gadget Server --> Gadget Repository
 * In the wizard, click on Add New Gadget
    
 * Give the Gadget Name and URL and click on Add Gadget
     eg: Say you want to host the Product List Gadget. For the URL you should give the path where the respective gadget xml is stored in the Registry Resource. Please note that the URL should be specified with /registry/resource as follows
          Product List
          /registry/resource/_system/config/repository/dashboards/gadgets/ProductList.xml
 * Go to Manage Gadget Server --> View Portal and click on Add Gadgets. Search for the newly added gadget and click on Add It button.

 * Then in the portal you will see your gadget appears.
 * Likewise add all the gadgets.
   

How to resolve "Too many open files" problem

When running certain software in your Linux environment, you may have come across the following exception, which is a process blocker.

/wso2/carbonstudio/eclipse/esb/mediator/impl/EnrichMediatorImpl.class (Too many open files)
at java.io.FileOutputStream.open(Native Method)
at java.io.FileOutputStream.<init>(FileOutputStream.java:179)
at java.io.FileOutputStream.<init>(FileOutputStream.java:131)
at org.ant4eclipse.lib.core.util.Utilities.writeFile(Utilities.java:1049)
... 95 more 


Sometimes these occur due to lack of some property setting in your machine.
If you too are fed up of tackling with those errors, follow the steps below for a fix.
  • Step 1
Go to /etc/security directory of your computer by the following command in your console
     cd /etc/security
  • Step 2
edit the limits.conf with following properties and save.
* soft      nofile   65535
* hard    nofile   65535Make sure that you do not comment on the above 2 lines. 
 
Problem Solved!! Now you can carry on your work.

Data service for the Shopping cart with WSO2 Carbon Studio

In the earlier post, you saw how to take the approach to convert your normal business into a SOA supported business.
In this example, we need to create five carbon application projects to support various aspects of this shopping cart.
   1. AcmeBackendServices - to create all the back-end related artifacts
   2. AcmeFrontendMonitor - to create all front-end gadgets
   3. AcmeFrontendOperator - to create Web application artifact to manage Acme shopping cart
   4. AcmeFrontendUser - to create front-end portal
   5. AcmeShoppingService - to create inter-mediate message passing ESB artifacts

Set up your environment to create the shopping cart's data service in carbon studio
  • Step 1
Download and install carbon studio.
  • Step 2
Check out the latest version of shopping cart sample from here. This contains
resources related to several artifact types such as ESB, BPS, Data Services, Gadgets etc.
  • Step 3
Go to the directory where the shopping cart is located. From there, build the shopping cart sample with the following command
    mvn clean install -Dmaven.test.skip=true
For this, you should have apache-maven installed in your machine. (Don't have maven? Download and install as per README)
  • Step 4
Download the WSO2 Data Services Server to deploy the created data service. The installed location will be refered as DS_HOME

Creating Data Service
From here onwards I will refer the location of your shopping cart sample as, SHOPPING-CART_HOME
  • Step 1
If you have successfully built the shopping cart sample as stated in above step 3, you should see a directory called "database" in SHOPPING-CART_HOME/target.
Copy that to your DS_HOME/samples. (Merge the two database folders.)
Now you have the database setup regarding shopping cart (with tables such as Category, Product, Customer, Payment etc.) in your system.
  • Step 2
Now we will create the legacy database system of Acme Shopping Cart.
With Carbon studio, you can create data service artifacts pointing to a data service descriptor file (.dbs) in several ways. In this sample, we will just import the data service descriptor file that we have checked out. (SHOPPING-CART_HOME/data-service/dbs/ShoppingCartDS.dbs)
  • Step 3
If you have already installed carbon studio to your Eclipse IDE, create a new carbon application project AcmeBackendServices.
For that, go to File --> New --> Project...
 Select Carbon Application Project from the wizard.
 

Give the name for the project as AcmeBackendServices and a location to save and click Finish.

Now you will see a new project is created with the given name, according to the following structure.
 
  • Step 4
TO create a data service, right click on AcmeBackendServices CApp project and select Data Service from the menu.

  
Now you will get a wizard. Since we already have the data service descriptor (.dbs) file in the checked out SHOPPING-CART_HOME/data-services/dbs directory, we will select the option Import data service from file. Give the location to the .dbs file.
Select AcmeBackendServices CApp project and click Finish.

  • Step 5
Now you will see new Data Service artifact is created under AcmeBackendServices project.
Congratulations!!
You have set up the data service required for the Acme Shopping cart.
  • Step 6
We use this data service, to connect with other partners. Usually we do not connect the legacy databases to applications as it is. Therefore for each and every creation of configurations in the sample, we will be using the created data service. To get the service URL for this service which allows you to use this in any other server, we need to create this artifact in a server.

Go to root-artifact.xml.
There it will show the Existing artifacts in that CApp. At this moment, you will see only ShoppingCartDS as an available artifact. Select it and save.
  

Now we can create the carbon application archive (.car) project out of this AcmeBackendServices by clicking on top right corner icon in the root-artifact.xml graphical view.


Specify a location to save the .car
  • Step 7
Start the DS server and go to management console.
Go to Manage -> Applications -> Add
Upload the created AcmeBackendServices.car


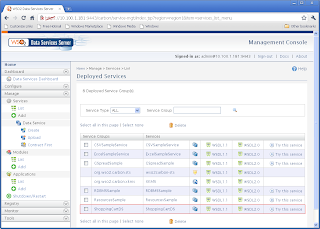
Go to Manage -> Services -> List
If the .car got deployed without any errors, you will see the ShoppingCartDS listed there.
   
You can click on Try this service and see whether it is working properly.

You have successfully exposed your legacy database to the shopping cart application now through a web service.

Await for the next post. It will demonstrate how to create a gadget to view these database information.